Customize MCU Layout
You can customize the MCU layout by pasting your function code directly in JavaScript Layout Function in your LiveSwitch Console, or using the REST API.
Note
Layout Manager presets such as Skype, Google, and Facetime aren’t compatible with MCU connections.
For adding more flexibility to custom MCU layout, you can set the LayoutZone and LayoutPriority properties when creating new upstream connections. Custom layouts can use these properties to determine the order, size, and position of an upstream video in the MCU layout. For example, you can allow a promoted stream displayed on the left 75% of the screen and the users displayed on the remaining right 25% of the screen.
LayoutZone: Allows grouping connections into zones in the MCU layout.LayoutPriority: Allows sorting connections within zones in the MCU layout.
When developing a custom layout, there are no pre-existing zones. However, the RTMP layout has a set of zones defined in fm.liveswitch.RtmpLayoutZones. For custom layouts, you can use any zone names of your choice. Supported zones are defined by the layout.
To change the layout zone or priority on a connection, you need to set the CanUpdateLayout permission on the channel claim. To create a new connection with a specified zone or priority, the zone must appear in the AllowedLayoutZones claim and the priority must be greater than or equal to AllowedLayoutPriority.
Custom Layout Modes
Custom layouts support the following two modes in the LayoutMode property:
Classic
- The number of output frames must match the number of inputs.
- Output frames are assigned to the inputs based on the order of the inputs.
- Render order is based on the input order.
- The crop flag doesn't work as expected.
Advanced
- The number of output frames can be different from the number of inputs.
- Each output frame must have a
connectionIdassociated to determine how to map to the inputs. - Render order is based on the reverse order of the output frames (last index rendered first, first index rendered last).
- If the
cropflag isn't set, then frames will contain the video to their dimensions. If thecropflag is set to true, then the video will cover the frame. Aspect ratio maintained in both cases.
JavaScript Layout Function
The function structure looks like the following:
/**
 * @param {inputs[]} inputs  The current inputs.
 * @param {output}  output  The current output.
 *
 * @return {Layout}         The desired layout.
 */
function layout(inputs, output) {
  ...
  return {
    size: output.size,
    frames: ...
  };
}
Your custom function name must be layout and the parameter names of the layout function must be inputs and output.
Custom Layout Interfaces
interface inputs {
    connectionId: string;
    connectionTag: string;
    content: string;
    clientId: string;
    deviceId: string;
    userId: string;
    size: Size;
    zone: string;
    priority: number;
    createdOn: number;
}

interface output {
    size: Size;
    channelId: string;
    applicationId: string;
}

interface layout {
    size: Size;
    frames: Frame[];
    crop: boolean;
    layoutMode: string;
}

interface Frame {
    origin: Point;
    size: Size;
    orientation: number; // 0, 90, 180, or 270
    connectionId: string
}

interface Point {
    x: number;
    y: number;
}

interface Size {
    width: number;
    height: number;
}
Passing Data Into Custom Layouts
When a connection is created on the client, the client userId and optional connection tag will show up in the server side JavaScript layout function as input.userId and input.connectionTag.
var client = new Client(...userId, deviceId, etc...)
connection = client.createMcuConnection(audioStream, videoStream, dataStream);
connection.setTag('MCU');
...
These values will also show up back in the client side addOnMcuVideoLayout handler as seen here:
channel.addOnMcuVideoLayout(videoLayout => {
	var regions = videoLayout.getRegions();
	var connectionTag = regions[0].getConnectionTag();
	var userId = regions[0].getUserId();
	...
    });
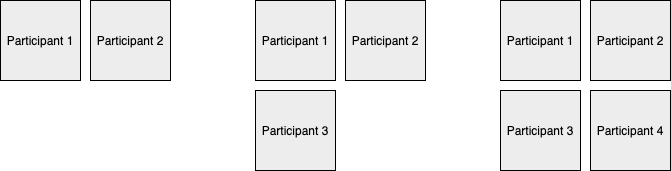
A Basic Static Layout Example
The following code example demonstrates a basic JavaScript layout function. The function displays participants side by side and from left to right. It keeps sections empty until the participants joining in. A maximum of four participants are shown at a time, but everyone can be heard. The diagram shows what it looks like from two to four participants.
JavaScript code
function layout(inputs, output) {
    var rows = 2;
    var cols = 2;
    var frameWidth = 360;
    var frameHeight = 240;
    var layout = {
        frames: [],
        size: {
            width: frameWidth * cols,
            height: frameHeight * rows
        }
    };
    for (var i = 0; i < inputs.length; i++) {
        var col = 0;
        var row = 0;
        if(i === 1) {
            col = 1;
            row = 0;
        }
        if(i === 2) {
            col = 0;
            row = 1;
        }
        if(i === 3) {
            col = 1;
            row = 1;
        }

        layout.frames.push({
            origin: {
                x: col * frameWidth,
                y: row * frameHeight
            },
            size: {
                width: frameWidth,
                height: frameHeight
            },
            orientation: 0
        });
    }
    return layout;
}
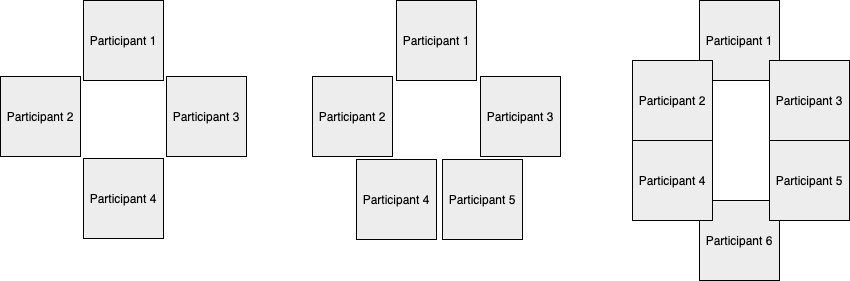
A Complex Circular Layout Example
The following code example demonstrates a more complex circular layout example function. The diagram shows what it looks like from five to six participants.
JavaScript code
/**
 * Apply a circular layout.
*/
function layout(inputs, output) {
    var center = {
        x: output.size.width / 2,
        y: output.size.height / 2
    };
    var radius = Math.min(output.size.width, output.size.height) / 4;
    // the top of the circle
    var angle = 1.5 * Math.PI;
    var frames = [];
    for (var i = 0; i < inputs.length; i++) {
        frames.push({
            orientation: 0,
            origin: {
                x: (radius * Math.cos(angle) + center.x) - (radius / 2),
                y: (radius * Math.sin(angle) + center.y) - (radius / 2),
            },
            size: {
                width: radius,
                height: radius
            }
        });
        angle += (2 * Math.PI / inputs.length);
    }
    return {
        size: output.size,
        frames: frames
    };
}