Welcome to our first part of the Getting Started Guide. In this tutorial, you'll learn how to do the following:
Add an application in the LiveSwitch Console
Add an application in the LiveSwitch Cloud
Set up your development environment
Write log messages
Generate a token
Register a client
Join the client into a channel
At the end of this tutorial, you'll build a simple "Hello World" app that connects to the LiveSwitch Cloud. Once you complete this tutorial, you'll have the foundation to build LiveSwitch applications in subsequent tutorials.
At the end of this tutorial, you'll build a simple "Hello World" app that connects to the LiveSwitch Server. Once you complete this tutorial, you'll have the foundation to build LiveSwitch applications in subsequent tutorials.
Before you can work on your code, you must add an aplication in the LiveSwitch Console.
Log in to your LiveSwitch Console at https://{your-gateway-domain}:{port}/admin.
Create a "Hello World" application by clicking Applications > NEW APPLICATION, and then enter the desired Application ID and Shared Secret.
Go to the Home page and select the application you just created in the Start Developing page. You should see your Application ID, Gateway URL, and Shared Secret there. You'll need them for generating your application token.
Set Up Your Project
We've set up a GitHub repository that contains the project code for this tutorial. This repository includes the starting code for the .NET, Android, iOS, and TypeScript projects under the net, android, ios, and typescript folders. You can choose the desired language and start building an app from there. Each project includes all not-yet functional classes required for the app. We'll ask you to copy the code from the tutorial to the class files to make them functional during your learning.
To make things easier, we also provide all the UI components for the app so that you can focus on learning LiveSwitch's API. We've commented out the code for UI that's not needed for your first app. We'll ask you to uncomment the code in the subsequent tutorials when a UI is needed.
Download and unzip the LiveSwitch .NET SDK from the LiveSwitch Server Downloads page.
Download and unzip the LiveSwitch .NET SDK from the Cloud Console Downloads page.
In your project root directory, create a lib folder.
Copy all the .dll files from the DotNet45 folder in the LiveSwitch .NET client SDK into the lib folder.
Copy the DotNet45\lib\win_x64 and DotNet45\lib\win_x86 folders from the LiveSwitch .NET client SDK to the lib folder.
Use Visual Studio to open HelloWorld.sln.
Add all the .dll files in the lib folder as references.
In Visual Studio's Solution Explorer, click Show All Files.
Include lib\win_x64 and lib\win_x86 into the project by right-clicking them and selecting Include in Project.
Important
Select all the files in the two folders. Right-click the files and then click Properties. In the Properties tab, set Copy to Output Directory to Copy if newer.
In your project, open the HelloWorldLogic.cs file and add using FM.LiveSwitch;.
Open the project file using Android Studio and set up your project's native libraries and LiveSwitch libraries following the instructions below:
Native libraries
Download and unzip the LiveSwitch Android SDK from the LiveSwitch Server Downloads page.
Download and unzip the LiveSwitch Android SDK from the Cloud Console Downloads page.
Copy the jniLibs folder from the SDK to your Android project's app/src/main folder.
Go to your project non-source files, open app/build.gradle.
In app/build.gradle, add the following to the end of the android block:
Click HelloWorld > Build Settings, and click the All tab.
Search for Bridging in the search field. In the search result, double-click Objective-C Bridging Header and enter the location of the header file you just created. Note that it assumes that the root directory is the project name. For example, if the ObjCHeader was created under the lib folder, the location would be lib/ObjCHeader.h.
While still in Build Settings, search for Linking. In the search result, double-click Other Linker Flags and add the -ObjC.
Missing this step will produce the following runtime failure: 'NSInvalidArgumentException', reason: '-[__NSArrayM fmSetObj:atIndex:]: unrecognized selector sent to instance
Download and unzip the LiveSwitch Web SDK from the LiveSwitch Server Downloads page.
Download and unzip the LiveSwitch Web SDK from the Cloud Console Downloads page.
In your project's root directory (liveswitch-codelabs/web/HelloWorld), create a lib folder.
Copy the files from the SDK's Libraries folder to your project's lib folder.
Open your project file HelloWorld.sln using Visual Studio.
Include the lib folder into the project by clicking the Show All Files icon and select all the files in the lib folder.
Compose the Token
In a video conference, you need some way for the participants to communicate with each other. In LiveSwitch, the Gateway fulfills this role. The Gateway connects everyone who wants to participate in a media session. It controls which individuals can communicate with each other and restricts unauthorized access. To start a session, you must first register with the LiveSwitch Gateway. When you submit a request to register, you're required to generate an authorization token.
A token is a key that's encoded with the details of your authorization request. Each token is composed of several parts.
A channel is a unique identifier that describes an audio or video conference. Generally, for each video conference that the participants join in, you'll want to have a unique channel associated with it. We'll use "stream-channel" as our channel ID for this tutorial but you can use any string for the ID.
Paste the following code into the Config.cs file, and replace with your own Application ID, Shared Secret, and Gateway URL.
public class Config
{
    public static readonly string ApplicationId = "replace-with-your-app-id";
    public static readonly string ChannelId = "stream-channel";
    public static readonly string GatewayURL = "replace-with-your-gateway-url";
    public static readonly string SharedSecret = "replace-with-your-shared-secret";
}
Paste the following code into the Config.java file, and replace with your own Application ID , Shared Secret, and Gateway URL.
public class Config {
    public static final String applicationId = "replace-with-your-app-id";
    public static final String channelId = "stream-channel";
    public static final String gatewayUrl = "replace-with-your-gateway-url";
    public static final String sharedSecret = "replace-with-your-shared-secret";
}
Paste the following code into the Config.swift file, and replace with your own Application ID, Shared Secret, and Gateway URL.
class Config {
    public static let applicationId: String = "replace-with-your-app-id"
    public static let channelId: String = "stream-channel"
    public static let gatewayUrl: String = "replace-with-your-gateway-url";
    public static let sharedSecret: String = "replace-with-your-shared-secret"
}
Paste the following code into the Config.ts file, and replace with your own Application ID, Shared Secret, and Gateway URL.
export class Config {
    public static applicationId: string = "replace-with-your-app-id";
    public static channelId: string = "stream-channel";
    public static gatewayUrl: string =  "replace-with-your-gateway-url";
    public static sharedSecret: string = "replace-with-your-shared-secret";
}
Write Log Messages
The LiveSwitch Client SDK has a logging API that provides information about what's happening for you to troubleshoot your app. To write log messages, you must set the log level to define the importance of the message and register a log provider where you'll output your log messages. For more information about setting up log, refer to the Set Up Client Logging topic. Here, we set the log level as Debug and use the default provider which is the IDE's console.
Copy the following code inside the HelloWorldLogic class in the HelloWordLogic.ts file.
private constructor() {
    // Log to console.
    fm.liveswitch.Log.registerProvider(new fm.liveswitch.ConsoleLogProvider(fm.liveswitch.LogLevel.Debug));
}
Join a Channel
The next step is to make a registration request. Do the following:
Create a client instance and instantiate it.
Generate an authorization token for that client.
Warning
You should never generate the token client-side in production. We're doing so for demo purposes only. For more information, refer to the Generate Authorization Token Server Side topic.
Register the client with the token by invoking the client.register method of the client instance. This method returns a promise, which is resolved if the registration is successful and is rejected if it's not. Write the registration state to log.
Tip
Make sure to validate the result of this promise before attempting to proceed with any further operations. If the registration is successful, the promise returns a set of channels that it has registered the client to. These will match the channels that you specified when you created your authorization token.
When composing the token, we hard-coded the channel ID for demonstration purposes. This joins the client into the channel automatically.
Copy the following code inside the HelloWorldLogic class.
// Create a client instance
public Client Client { get; private set; }
public Channel Channel { get; private set; }
// Make a registration request
public async Task JoinAsync()
{
    // Instantiate the client
    Client = new Client(GatewayURL, ApplicationId);
    ChannelClaim[] channelClaims = new[] { new ChannelClaim(ChannelId) };
    string token = Token.GenerateClientRegisterToken(
        ApplicationId,
        Client.UserId,
        Client.DeviceId,
        Client.Id,
        null,
        channelClaims,
        SharedSecret
    );

    var channels = await Client.Register(token).AsTask();
    OnClientRegistered(channels);
}

private void OnClientRegistered(Channel[] channels)
{
    Channel = channels[0];
    DisplayMessage($"Client {Client.Id} has successfully connected to channel {Channel.Id}, Hello World!");
    Log.Info(string.Format("Client {0} has successfully connected to channel {1}, Hello World!", Client.Id, Channel.Id));
}
// Client and channel
private Client client;
private Channel channel;

public Channel getChannel() {
    return channel;
}

public Client getClient() {
    return client;
}

// Make a registration request.
public Future<Channel[]> joinAsync() {
    // Create a client.
    client = new Client(gatewayUrl, applicationId);

    // Create a token (do this on the server to avoid exposing your shared secret).
    String token = Token.generateClientRegisterToken(applicationId, client.getUserId(), client.getDeviceId(), client.getId(), null, new ChannelClaim[]{new ChannelClaim(channelId)}, sharedSecret);

    // Register client with token.
    return client.register(token).then(this::onClientRegistered, ex -> Log.error("ERROR: Client unable to register with the gateway.", ex));
}

// Register the client with token.
private void onClientRegistered(Channel[] channels) {
    // Store our channel reference.
    channel = channels[0];

    Log.info("Client " + client.getId() + " has successfully registered to channel = " + channel.getId() + ", Hello World!");
}
var _client: FMLiveSwitchClient?
var _channel: FMLiveSwitchChannel?

func joinAsync() -> FMLiveSwitchFuture?  {
    self._client = FMLiveSwitchClient.init(
        gatewayUrl: _gatewayUrl,
        applicationId: _applicationId)

    let claim: FMLiveSwitchChannelClaim = FMLiveSwitchChannelClaim.init()
    claim.setId(_channelId)
    let claims: NSMutableArray = []
    claims.add(claim)

    let token: String = FMLiveSwitchToken.generateClientRegister(
        withApplicationId: _applicationId,
        userId: (_client?.userId())!,
        deviceId: (_client?.deviceId())!,
        clientId: _client?.id(),
        clientRoles: nil,
        channelClaims: claims,
        sharedSecret: _sharedSecret)

    // Write registration state to log
    self._client?.addOnStateChange({(obj: Any!) in
        let clientObj = obj as! FMLiveSwitchClient
    })

    return _client?.register(withToken: token)?.then(resolveActionBlock: { [weak self] (obj: Any!) -> Void in
        self!.onClientRegistered(obj: obj)
    })?.fail(rejectActionBlock: { (e: NSException?) in
        FMLiveSwitchLog.error(withMessage: "Client failed to register.", ex: e)
    })
}

// Register the client with token
func onClientRegistered(obj: Any!) -> Void {
    let channels = obj as! [FMLiveSwitchChannel]
    self._channel = channels[0]

    FMLiveSwitchLog.info(withMessage: "Client \(String(describing: self._client?.id()!)) has successfully joined channel \(String(describing: self._channel?.id()!)), Hello World!")
}
public client: fm.liveswitch.Client;
public channel: fm.liveswitch.Channel;

public joinAsync(): fm.liveswitch.Future<Object> {
    const promise = new fm.liveswitch.Promise<Object>();

    // Create a client.
    this.client = new fm.liveswitch.Client(this.gatewayUrl, this.applicationId);

    // Write registration state to log.
    this.client.addOnStateChange(() => fm.liveswitch.Log.debug(`Client is ${new fm.liveswitch.ClientStateWrapper(this.client.getState())}.`));

    // Generate a token (do this on the server to avoid exposing your shared secret).
    const token: string = fm.liveswitch.Token.generateClientRegisterToken(this.applicationId, this.client.getUserId(), this.client.getDeviceId(), this.client.getId(), null, [new fm.liveswitch.ChannelClaim(this.channelId)], this.sharedSecret);

    // Register client with token.
    this.client.register(token)
        .then(channels => {
            this.onClientRegistered(channels);
            promise.resolve(null);
        })
        .fail(ex => {
            fm.liveswitch.Log.error("Failed to register with Gateway.");
            promise.reject(ex);
        });

    return promise;
}

private onClientRegistered(channels: fm.liveswitch.Channel[]): void {
    // Store our channel reference.
    this.channel = channels[0];

    const msg = `Client ${this.client.getId()} has successfully connected to channel ${this.channel.getId()}, Hello World!`;
    fm.liveswitch.Log.debug(msg);
    this.displayMessage(msg);
}
Run Your App
Note
LiveSwitch recommends that you use a phone and not an emulator to run the mobile apps. It's possible to run the mobile apps on an emulator, but the camera doesn't work.
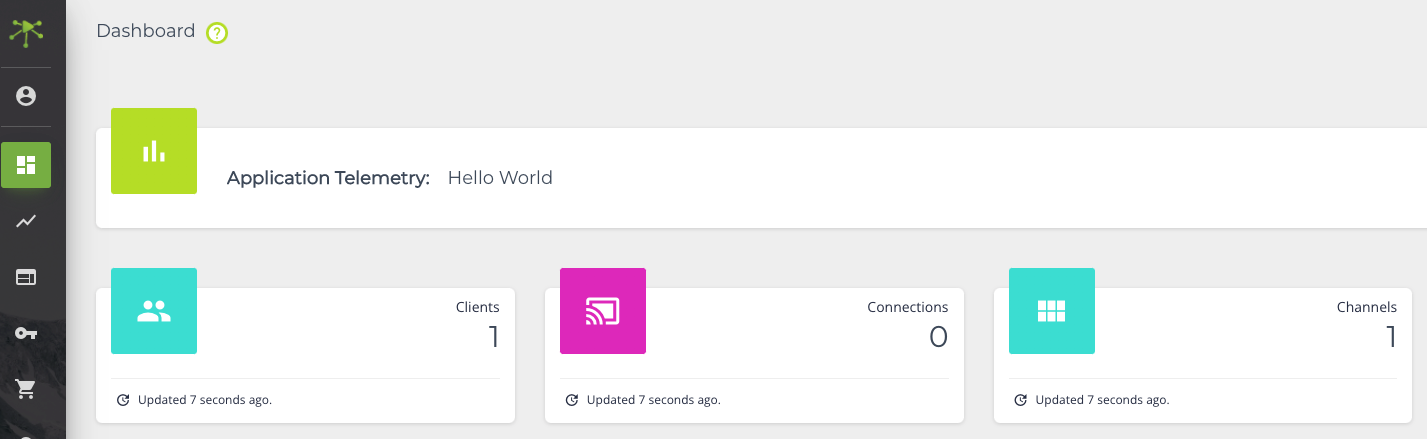
Run your app in your project IDE. Your app window appears with several buttons. Click Join. You should see the client has successfully joined message. Congratulations, you've built your first LiveSwitch app! Now, go to your LiveSwitch Console, and select the Hello World app. You should see one client and one channel.
We don't have any connections because we haven't streamed any video yet. All the buttons except **Join** aren't functional. We'll make them functional in subsequent tutorials.
Have an Issue?
If you run into an issue, use the Report an issue button to get help fixing the problem.